Feed on
Posts
Comments

The plants are growing well, now that the sun angle is down and the temperatures don’t get too hot inside the greenhouse. The wild grass all around us is turning brown, and some bushes and plants are starting to show fall colors.  Won’t be long now!  My favorite season is coming up.

A couple of nights ago we were awakened around 2am by dry lightning all around us, far enough away we couldn’t hardly hear thunder, just saw the light show.  Yesterday evening there was a lightning strike very close to our house (within a couple of seconds at most between the flash and then boom), but then it poured heavy rain for a while, so we’re assuming all is well.  Still, with dry grass it’s disconcerting to see any dry lightning storms at all.  We’ll be so glad when it starts raining more frequently.
\\

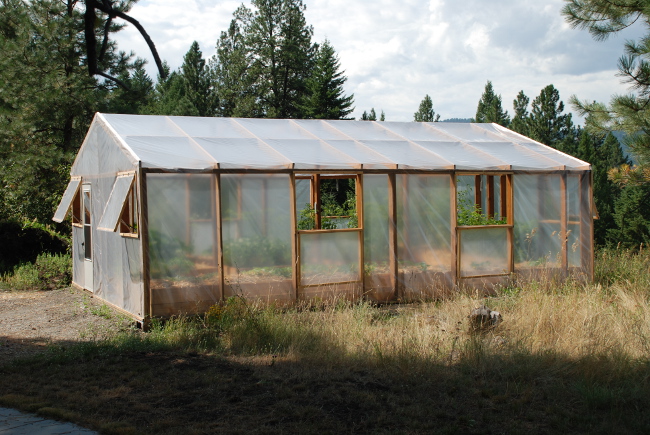
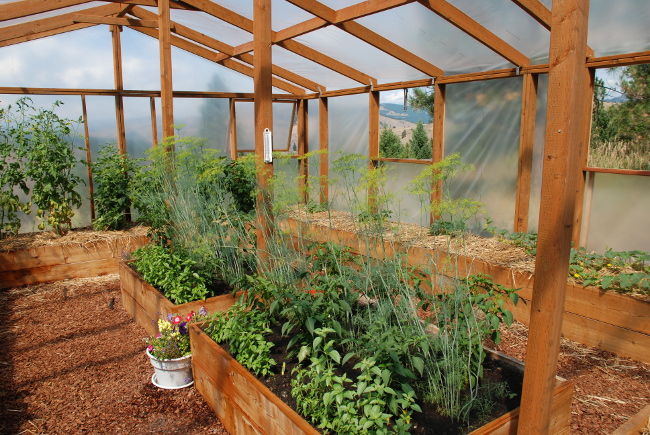
Dan put in four more opening windows, for a total of eight windows, and even so it was too hot some days. Next year we will need a shade cover.
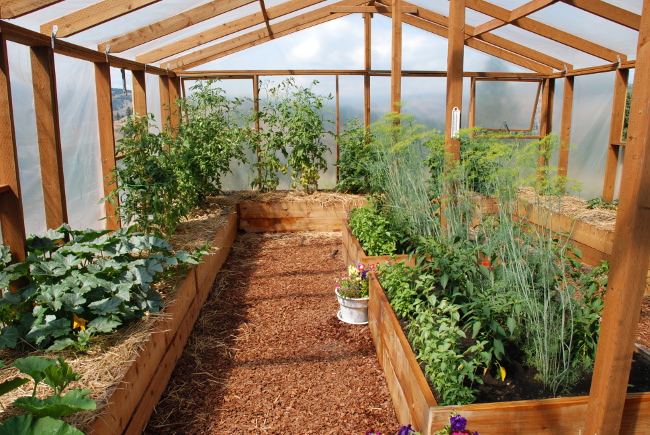
On the right hand side is a row of basil plants, then pepper plants, and in the middle a row of dill plants. On the left are the two squash plants.

The back wall is tomato plants and they are so tall now.   A couple of them are trying to make a break for it, out the window.

The pepper plants closest to Dan when he was taking this picture are jalapeño plants.

The jalapeño plants were mis-labled at the store (supposed to be bell peppers), but that’s ok.  I will make my first ever batch of pickled jalapeño slices for use on nachos this coming winter.  I’ve been dicing them up, fresh, to put in our breakfast scramble, and they are delicious.  So it was a happy accident that we planted some of this variety of pepper and they will always be on our list to grow, from now on.
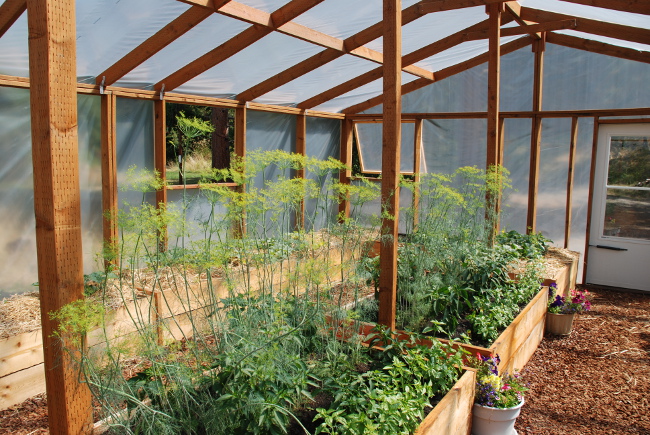
 

The dill plants are forming really pretty seed heads. I really wish we had some cucumbers ready for pickling.

This is not to say we don’t have any cucumbers at all, but they are tiny so far, and not very many of them.   If the greenhouse extends the season for another six weeks, we’ll end up with plenty of pickled cucumbers, in the long run.
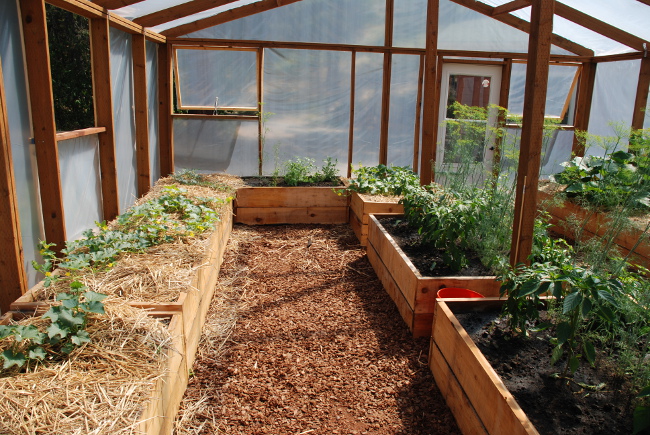
The melon plants all have set fruit, but it's still so tiny you can't see them on the plants unless you look very closely.

At the end of the row is my nascent herb garden.  The plants are almost big enough (some of them), that I can harvest some for cooking.  Next year the perennial herbs will have a good head start and get into gear.
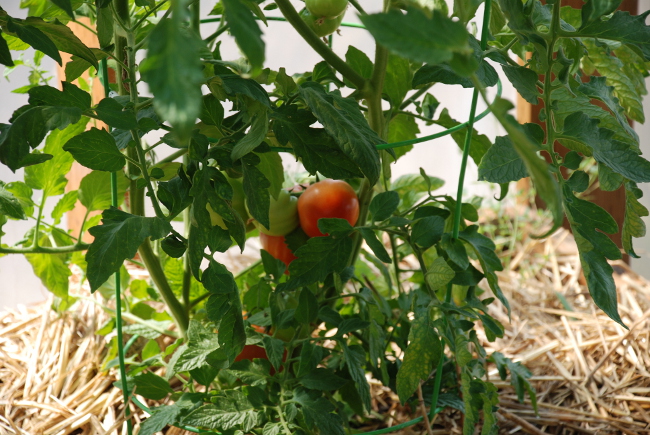
A couple of the eating tomatoes are starting to show color. We will be able to pick these in a few more days.
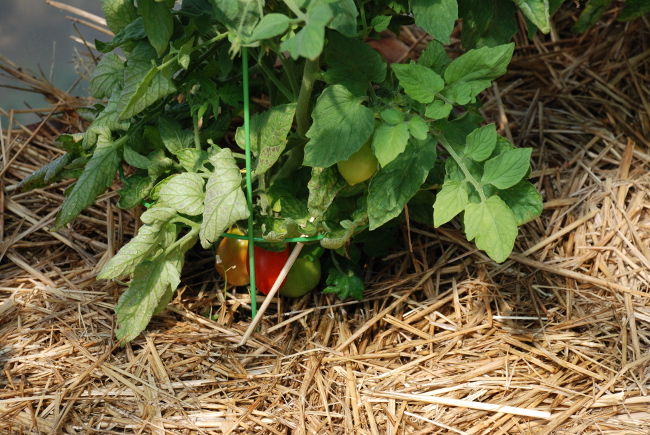
We've been picking Roma tomatoes for over a week now, and adding them to whatever I'm cooking that day. They are so delicious!

The straw we put around all the plants helps to keep moisture in the beds where the plants can use it, and has seriously cut down on the number of weeds in the greenhouse.
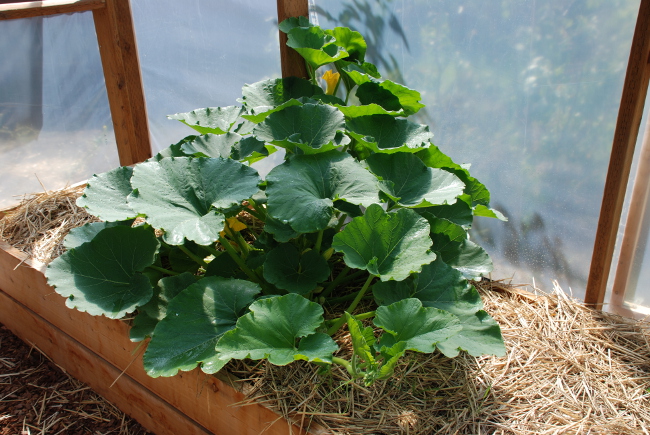
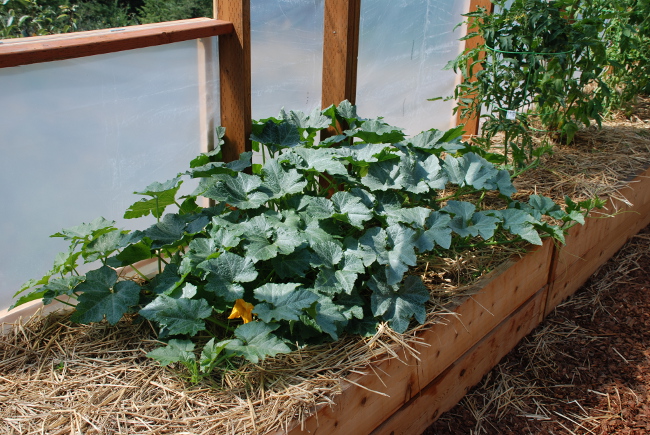
This is a butternut squash plant; it has three or four fruits hiding inside the middle of the plant. They are still small, but starting to grow larger. It will be nip and tuck, whether or not they will have enough time to ripen. Regardless, it's a pretty plant.

This is a Delicata squash plant, and it has quite a few tiny squash growing.

Again, if the greenhouse will protect the plants from the first killing frost, we should have enough time for the squash to ripen.  It will need to protect the plants from temperatures under 27F outside, but if it will, then we should have a growing season through the end of September and that will be very exciting!

Tofu Scramble recipe

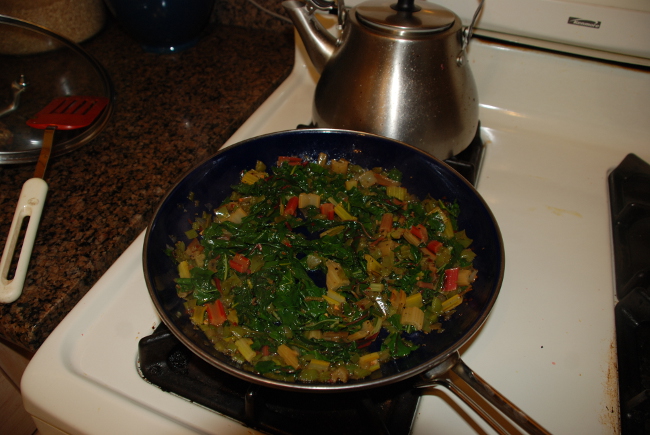
First chop up 1/2 cup of onions, and one cup of peppers (I use a combination of green bell peppers, red bell peppers, anaheim peppers, and a hot pepper).  Add the chopped stems from swiss chard (roughly a cup of chopped stems).  Saute them in a couple of tablespoons of olive oil, over low heat, with salt and pepper, and 1/4 teaspoon Chipotle chili flakes, for 10 minutes, until the vegetables are soft.
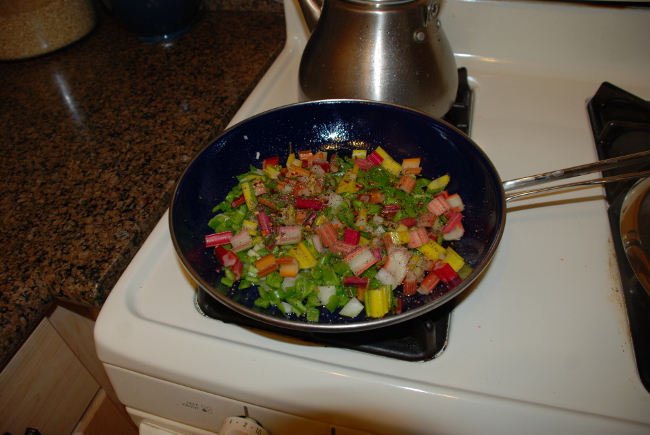
These chopped vegetables are almost ready for the next step. The swiss chard stems are so pretty, add a splash of color to the scramble, plus great vitamins and minerals.

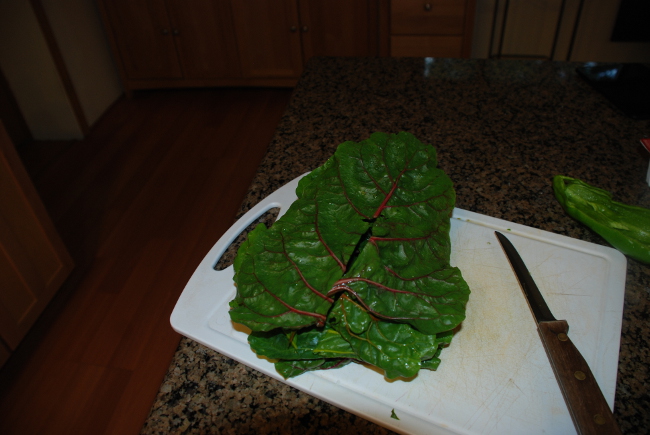
Swiss chard leaves. I have seven of them piled up, ready to be chopped into slices.

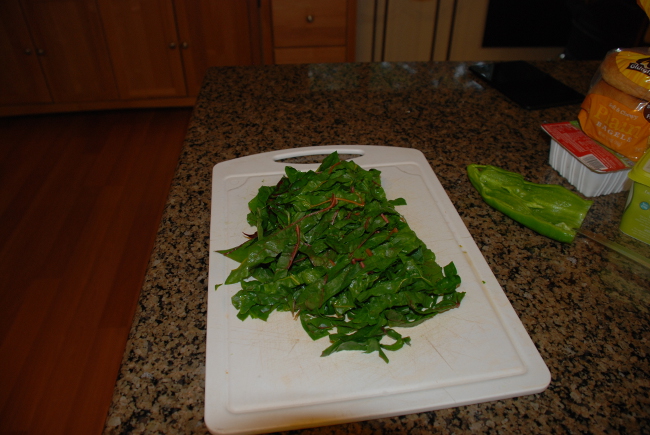
All sliced up into strips, so they will cook quickly when I add them to the pan.

As soon as the chopped vegetables are fairly soft, I add the strips of swiss chard leaves, and pop a lid on the pan to steam the leaves.  This takes about 5-10 minutes.  Stir them around occasionally.
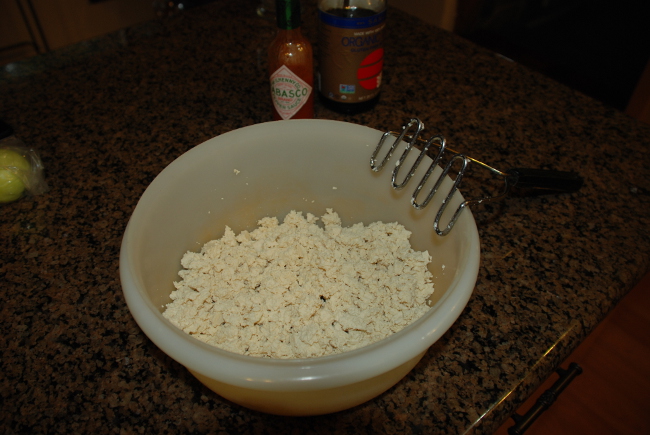
Extra firm tofu, which has been wrapped in paper towels and extra moisture removed, then crumbled up using a potato masher.
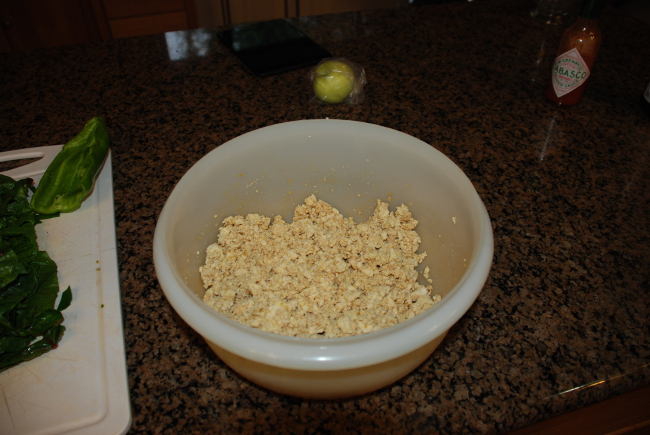
I add a couple of tablespoons of gluten free soy sauce, and two tablespoons of nutritional yeast, and stir it all together. Then it is set aside to wait for the vegetables to finish cooking.

Once the swiss chard leaves are cooked, but still bright green, the tofu mixture is added.

All ready for the next step.

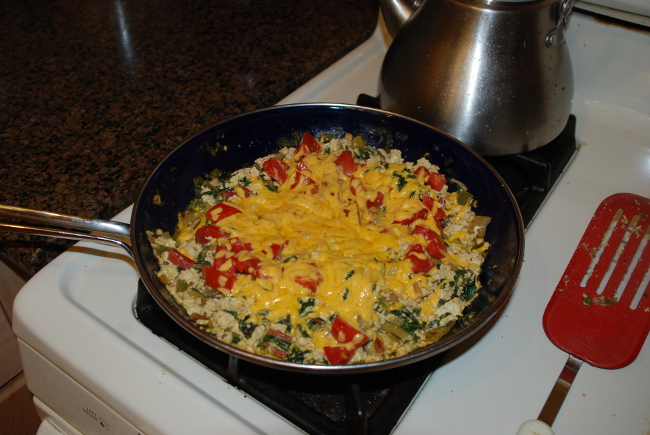
Add the tofu mixture, stir well.  Cover the pan again and cook, stirring occasionally (every few minutes), until the tofu is heated through.  This takes another ten minutes.   Then add a couple of chopped fresh tomatoes (a half cup, roughly, if the tomatoes are small), and some cheddar cheese.
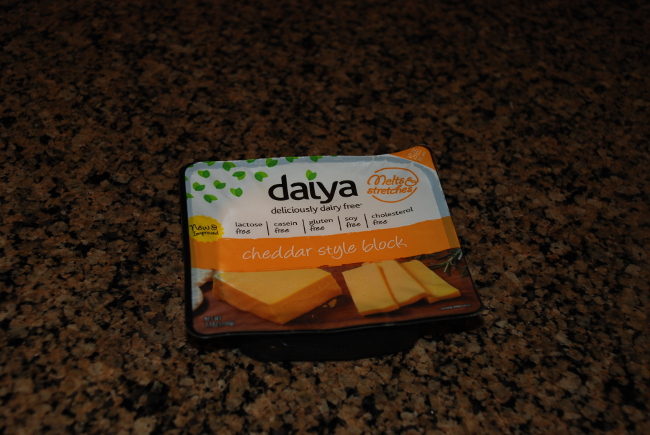
This is the best non-dairy cheddar cheese substitute I've found. It even works wonderfully for macaroni & cheese.

Cover the pan again and cook until the cheese is all melted (about five minutes). Then it's done.

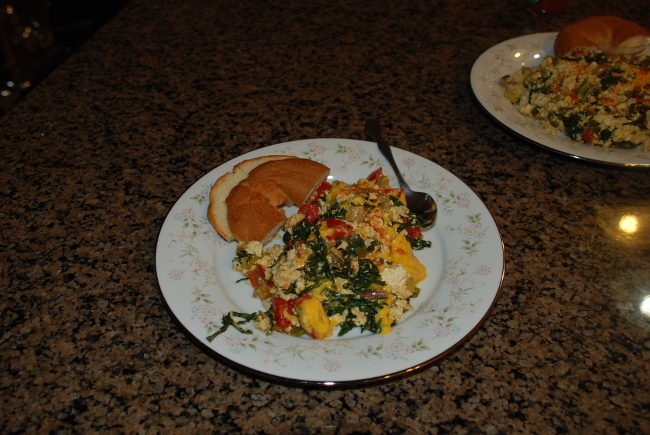
Add some tabasco sauce to the scramble, and a half a bagel which has been heating in the oven.

This is a great breakfast, and it re-heats really well so don’t worry about leftovers.  You can add some fried potatoes to the scramble, and leave out the swiss chard and Chipotle pepper flakes, and substitute smoked paprika for the spicing, for an entirely different taste.

We have this for breakfast several times a week, and we haven’t gotten tired of it yet.
Glacier NP Trip

In mid June we went to Glacier National Park to visit our old stomping grounds and visit Diana. She raises alpacas and llamas, and has a fiber processing mill. We walked out into the field where all the female and baby alpacas and llamas hang out. Diana was calling to them to come over and say “hi” and they were all basically ignoring us and pretending something out on the road was much more interesting. Finally a couple young alpacas came to visit, and the dominant female llama.

Diana told me, regarding the llama, “She likes to be scratched here on her neck.” So of course I obliged. Yes, she was a happy llama. That piqued the interest of all the other llamas and alpacas who formed a circle around us. That was a bit intimidating, to be circled by 35 animals who were almost all taller than me. It was very cool to make their acquaintance, and everybody who wanted a pet on the head got one.

Some fiber Diana gave me, Blue-faced Leicester/Silk roving hand dyed. A Blue-faced Leicester is a breed of long wool sheep, and their wool has a luster to it, so it works really wonderfully with silk. She made this roving.

Splitting the roving in half, and then dividing one of the halves into very thin strips, and coiling them into rounds.

This is going to be a fractal spinning project.  I’ll spin all the little coiled strips on one bobbin, and then I’ll spin the half of roving which was not split up on another bobbin, and then I’ll ply them together.  There will be short strips of color on the one bobbin, and really long strips of color on the other bobbin.  Once I have my yarn I’m going to weave a scarf with it.

We only spent a couple of days in the Glacier area, hoping to see a couple of bird species we regularly saw in the park and up the North Fork where we used to live.  We were successful 🙂

The start of the trail of the cedars, a low altitude old growth grove of cedar trees. Dan is standing near one of the smaller trees at the entrance.

It's cool and twilight under the trees. Spots of sunlight penetrate the canopy and highlight a fern, here and there.


One of the large cedars immediately adjacent to the boardwalk which winds through the grove.

It’s one of the prettiest places in the park, and always a treat to walk the mile long trail.

Halfway around the trail there is a small bridge which crosses a stream that flows into the larger stream that runs through the grove. This little stream has cut its way down from the mountains, through granite, and made a really beautiful series of waterfalls. Even on a really hot day, standing on the bridge above the falls is so cool and refreshing.

The spray from the falls has made lots of moss and ferns grow on the rocks.  It’s a neat spot.

This is the larger creek which flows through the cedar grove. It joins into MacDonald Creek, which flows into Lake MacDonald. We were staying in a cabin next to the lake.

Most of the time going through the grove, all you can see looking up is the branches on the underside of the canopy.

Occasionally you can see the mountains towering above, with seasonal waterfalls from snow melting.

We were there too early for the Going-to-the-sun road to be opened.  It was still blocked with many feet of snow from avalanches and snow slides.


MacDonald Creek, which flows into Lake MacDonald. This is a nesting place for Harlequin Ducks. Not right here, but they aren't intimidated by the speed and power of this water.

It's a really gorgeous creek, another favorite place to go when in the park.

A female Harlequin duck, all on her own. There had to be a male around somewhere, but he didn't show up while we were watching his sweetie.

View from the shore in front of the cabins. There were heavy clouds that morning, hiding the tall mountains.

We went up the North Fork, and to Bowman Lake.  The road to Bowman Lake made the road to our house seem smooth and well maintained by comparison.  We’d forgotten how rough it was.  Still worth the trip.

View from the boat launch of a portion of Bowman Lake.

Motors aren’t allowed on the lake, so it’s always quiet until a storm comes up, which can happen at any time and without any warning at all.  The lake goes back miles into the mountains.

Heading up to Rosalind's cabin we saw the other species we wanted to find, about where we expected to find it.

There were two male Spruce Grouse in the road, displaying to each other.  Both had pretty ratty tail feathers, so no hen would have been impressed, but they were certainly entertaining each other.

All in all, it was a very fun trip and that park will always remain one of our most favorite places to go to.


Dress Making

I had a dress that I used to wear all the time, and I wore it so much it just sort of started to disintegrate.  I packed it away for a rainy day, so to speak.  Then one day I decided I’d try to re-create the dress by taking the existing dress apart and using the pieces to make a pattern.  I bought some machine washable material, shiny and smooth on the inside, fuzzy on the outside, like a suede but not a suede, and a pretty teal green, and cut out the pieces.

The thing is, the original dress had buttons and I have looked for the last 25 years for a button hole attachment for my Singer treadle sewing machine, without success.   I bought a zipper initially thinking I’d replace the buttons with that, but then I just didn’t want to go with a zipper.   So the project stayed in a box waiting for a really monsoon rainy day.

Disassembled dress parts. There is a bodice and a skirt. The bodice has a back, left front, right front, facings for the neck line and down the front, and short sleeves. The skirt is full and gored, and had seven pieces, plus pockets with two pieces each.

Since I know some of my projects can last years, I wrote on the dress pieces where they fit in relation to each other, and the pieces were attached to the new fabric pieces with pins, so they would be identifiable.

And so this project languished for many years.  Then one day I gave up looking for a button hole attachment and decided to go electric.  I got a new toy, a Brother sewing machine which comes with a button hole attachment, as well as all kinds of other cool things, and I got my project out of the box.

First was to make the bodice.

I put the front pieces right sides together on top of the back, and sewed the side seams and the shoulder seams together. So far, so good.

The new sewing machine was easy to use once I figured out how to make a bobbin and how to control the speed.  Super slow motion was the speed of the day.

Then I matched the inter-facings on the neckline and down the front of the bodice, and sewed those in place.  Then I turned the inter-facings in and sewed along the seam on the right side to give it some definition.

Next I matched up the seams for the various skirt pieces to their next door neighbor and sewed those seams together. I matched the pieces from the waist down as all the pieces are not the same length.

I figured I could straighten out the length issue on the skirt somewhere down the line so I didn’t worry too much about keeping the pieces the same length when I cut out the pieces, originally.    I now wish I’d thought a bit harder about that decision.

While I was matching the skirt pieces together I put the pockets in where they belonged.

Now the skirt was in one piece and I matched up the waist to the bodice, pinned it together, and sewed it together.  All the pieces were now attached to each other.  That was exciting.

  My first ever button holes made using a sewing machine! I figured out how many buttons I wanted to use, bought some, and did math. The idea being to make the buttons evenly spaced down the front.

It was fun making button holes.  I’d made one by hand before (once), and that was enough to convince me I had to have a button hole attachment.

Hand sewing next, putting the buttons into the right place so they line up with the button holes.

Once this part is done, I’ll work on fitting the dress.  I’ve lost a lot of weight since I last wore this dress and modifications are going to be necessary.  I’ll put darts on the front, back and sides to bring in the waist, at some point. I think I’ll get the hem done first, which entails putting the dress on, and then marking the bottom for where I need to cut the longer pieces off to match the shorter pieces.  It’s way too hot to wear this dress now, so I’ll be waiting for cool fall weather.

And because I wanted to make it a little dressy, I bought some lace.

The sleeves are roughly three-quarters long, instead of the short sleeves of the original dress, since the material is suitable for cold weather, not hot.    I’ll gather the lace on on the ends of the sleeves, and around the hem of the dress to make it floor length.  The lace is also machine washable.

So that’s my project which has taken me about 15 years so far to get to this point.  I’ve tried the dress on and it will be a great winter dress, nice and cozy to wear around the house.


Josta Berry Jam

We picked six cups (almost) of our first harvest of Josta Berries, and I made jam yesterday.

The color of these mashed berries is a spectacular magenta purple.

The berries are very firm and hold their shape, so first I cooked them until they were softened, then I took a potato masher to the pot and tried to crush all whole berries.  For the most part I was successful.

It only made five small jars of jam.

A row of jam jars ready to put into the pantry.

When the jam is in a jar it is a really deep purple with red undertones.

It makes us both smile to see these little jars of jam. We've been looking forward to a harvest for years.

Starting next year we should see a larger harvest.  It takes years for these plants to get into the swing of things.  A fully mature plant will produce around ten pounds of fruit each.  And we have four of the plants.  Oh oh….

We have two gooseberry plants, and only one produced this year.  We got 25 pounds of fruit off that one plant which is now about ten feet in diameter.  Thank goodness the other plant didn’t do anything this year!

Dan says the Josta Berry jam is the best jam I’ve ever made.

For this year, anybody who wants to taste Josta Berry Jam has to come visit us.  Cassandra and Rod will be here in September.  Make your reservations soon 🙂

Berries Galore

The last couple of months we have been extremely busy.  I have tons of pictures to post, but haven’t had time to get them organized.  It’s on my to-do list.

The middle of June we went to Glacier National Park, and visited the Trail of Cedars, a low altitude grove of old-growth cedar trees near MacDonald Creek.  We saw the two bird species we were hoping to see during our trip, and wandered up and down the North Fork valley adjacent to the park, where we used to live.  And drove up to Bowman Lake in the park, the road to which makes the road to our house look downright civilized.

When we returned home again we got into a knock-down drag-out fight with the local rodent population over ownership rights to our garden.  We were afraid this year was going to be a total loss but all of a sudden we got the upper hand and now things are growing splendidly.

We have made several adjustments to the greenhouse in terms of ventilation, to try to keep the temperatures down to levels the plants will appreciate.  Next year a shade cloth is mandatory, it has just been too hot for the plants to produce to their full potential.

I’ve been re-learning how to sew using a sewing machine.  And I have a couple of spinning projects, and knitting projects for my spare time, should I ever see any of that.  The garden is taking up a lot of time these days.

We have been picking berries since late June.  The strawberries have all been picked and eaten, for the most part.

One of our bowls of strawberries, with a few stray raspberries just as they were starting to ripen.

The new strawberry plants are looking great, and we’re very much looking forward to next year for the June bearing plants to have their first crop.  The ever-bearing strawberries are small but sweet.

And I’ve been making jam, lots of jam, mostly raspberry, with some peach, cherry, red currant, and strawberry/cherry.  And more jam making is in my immediate future.

Raspberries, pie cherries, gooseberries, josta berries and black raspberries.

We’ve only gotten a total of 1.5 cups of josta berries off the plants so far.  They are getting ripe in stages.  So I’m freezing them as we pick them, until I have enough for a batch of jam.

We’ve gotten so many raspberries this year, it’s been fantastic.  They taste like sunshine to me.  I’ve made lots of jam and now I’m going to freeze the batches as we pick them, for winter desserts.

I’m also pitting and freezing the pie cherries for desserts.  In the freezer I also have a bunch of bing cherries, for jam later on when I have time.

This is the first batch of black raspberries (Black Caps), that we picked today, and it was 10 cups!  We’ll get at least this much again with the second picking.  Those also ripen in stages.  The plants are very well armed, with long and extremely sharp thorns.  Dan has racing stripes on his arms.  He picked these.  A lot of the berries are up way above where I can reach.

The gooseberry plant has gone crazy.  I have picked as much I picked all last year from the whole plant, and that is on less than 25% of the plant being picked.  I have achieved my goal of too many gooseberries.  We called Susan today to see if she wants to come do some combat berry picking.  She’ll be here on Wednesday.  The gooseberry plant is also well armed.

And I learned that playing with a predator can be dangerous.  It started out as an innocent game of peek-a-boo around the wood pole in the living room.  It’s his favorite game.

Mishkin accidentally snagged a vein with a tip of one claw and caused internal bleeding. It made a hell of a bruise, which is all gone now. I was a tad too slow when boxing with him. He just thinks we're both big cats.

So I have lots of pictures from the last two months and will get around to sorting them out one group at a time.

Functioning Greenhouse

We finished building the raised beds until we ran out of boards.   We have ordered some new boards to finish the last two raised beds.

And then we planted the raised beds we have built.  Now the fun starts – water the plants and watch them grow and then start harvesting!

Windows are built and functioning. And so is the screen door.

We decided to use a notched 2×2 board to hold the windows open, and maximize the size of the opening for air flow.  The automatic openers, while a nice concept, would only let us open the windows about half this much.

The northeast bed has three melon plants.

The northwest bed has three varieties of cucumber seeds planted. It will be a week before they peep up out and wave their baby leaves at the world.

The west wall has all tomato plants. Next to the cucumber bed is all Roma tomato plants, for future tomato sauce production. Next to them are eating tomatoes. And around corner on the southwest bed are more a variety of tomato plants, an heirloom variety, and some other types.

The southeast bed has a two squash plants. And the two middle beds each have six pepper plants, of various types.

More pepper plants 🙂

Where the chairs are sitting now will be another middle bed, roughly six feet long and four feet wide. It will be the home for another melon plant. And next to it, between the middle bed and the northwest bed will be another raised bed roughly four and a half feet long and three feet wide. That will be for my herb garden.

The boards to complete these last two beds will be here sometime later this week.  Building them doesn’t take so long as filling them up with dirt.

And then we can put the ground cloth down in the walking area and put the bark mulch on top of the ground cloth.  That is the last step to complete the greenhouse.

Down in the garden we have two more squash plants to be transplanted, and bush beans to plant, as well as some more salad greens.  And we have thinning to do.  The carrots resemble grass right now, and the beets came up very well, too.  The potatoes are growing well.  And I need to something with the rhubarb.  It has lots of big stalks to be diced up and frozen.


Greenhouse Interior

The building and raised beds should last a good thirty years before they need to be replaced. The plastic will hopefully last ten years or more before it needs to be replaced.

First raised bed is under construction. Once the boards are nailed together, we rolled hardware cloth over the entire bottom of the raised bed and screwed it down, then flip the raised bed over. This will prevent ground squirrels from coming into the raised beds from underneath.

Using 2×10 cedar boards, various lengths, we are building the raised beds, two boards high, for a soil depth of 20 inches when they are completely full of dirt.  The raised beds along the exterior walls of the greenhouse are going to be three feet wide.

Moved into position, this is the first row of the first bed. Dan then nailed it to the wall. Once these beds are full of dirt they will anchor the building to the ground, making it very stable even in high winds. The plastic might not survive but the building will.

End board for the second row is waiting to be joined to the longer side boards.

Once the second row of boards is all nailed together, it too is nailed to the wall. The weight of the boards will keep them together and the first half of the two beds on the north wall is now complete.

We will repeat this same process until all nine raised beds are completed.

Both raised beds are completed on the north wall of the greenhouse. The two raised beds are a total of twenty-eight feet long, and three feet wide.

We completed the south wall raised beds today as well, and tomorrow we have help coming to move dirt and start filling the raised beds.  So we have five more to build, and hopefully within a few days everything will be all completed, except for the windows which have yet to be built and installed.

Getting closer 🙂

Covered Greenhouse

Today we have covered the structure with greenhouse plastic.  The temperature was 68F outside, and 98F inside.  So now we have to get the windows and door installed so there is ventilation, and that will bring the temperature down to a comfy level for our little plants.

Hurray! It's a greenhouse!

Still a lot of work left to get this project completed but we’re getting so much closer.

Yesterday we got the rafters cut and in place.  That was a major accomplishment, and our neighbor came over to help us accomplish it.   I picked rhubarb in the garden and made a pie while Dan and Gary were putting up the rafters.

This morning Dan was checking all the rafters to make sure no nails were sticking up to catch the plastic covering, and to see if anything needed sanding, for the same reason.

While he was doing that, I got out a shovel, rake, and wheelbarrow and started to level the edges of the interior, to bring the dirt level up to the top of the foundation boards.

Then Dan started to put in all the bracing on the rafters.

Under the ridge board is a board that ties the rafters together. And then between each rafter is another board so that the span of plastic between the ridge board and to top of the wall will no longer be 12 feet, but split about in half.  This should keep the plastic from sagging with the snow in the winter.

Hurray!  The building is completed.  We still need to install hurricane clips on the rafter boards, attaching them to  exterior walls, but that’s the last thing to be done.  And then it’s time to put the plastic covering over the structure.

Tomorrow the weather is supposed to be pretty awful, so it won’t be tomorrow.  Which is a good thing.  We are both worn out.  But it’s done 🙂  Once the plastic is in place, we’ll build the raised beds and start filling them with dirt, and get everybody planted.

The melon plants are growing leaps and bounds.  The squash seeds are germinating, and so are all the herb seeds I planted.  The squash plants go into the garden, not the greenhouse, and at the same time we transplant those, we’ll plant the beans, and some more lettuce varieties, and our garden will be all planted for the growing season.  Exciting to watch everything grow.


Having knock-down drag-out fights with inanimate objects is never a good plan.

Yesterday was a really tough day, and we beat ourselves up pretty thoroughly.  We both have interesting bruises to prove it.  Today we may or may not do anymore construction it all depends on how we feel later today.  Also the weather gods might have a thing or two to say.

The first major issue was creating the center ridge beam.  We laid two 2×6 fourteen feet long boards end to end, and then overlapped two more boards, one cut in half, so that there would not be two cuts overlapping.  We now had a total of four boards put together.

Next step was to move the three concrete blocks with an adjustable bracket brace into place (several inches off their final location), and move the ridge beam so that it could rest in the brackets.  A level on the ridge beam told us which bracket needed to be adjusted to make the beam level.  This is much easier to describe than it was to accomplish.

The ridge beam is extremely heavy, almost too much for me to carry my end of it, and it is very flexible in the middle, despite a multitude of nails.  But we did get it moved and into the brackets.

After the beam is level, a measurement was taken on one of the end walls, to give us the finished height of the center support posts, 4×4 beams which will support the center ridge beam.  This way we can cut all the 4×4’s to the same length, and then fine tune their height with the nut and bolts under the brackets to make everything up on top level.  Cool concept!

Then the hard part.  Getting one end of the beam to the right height.  This was the part that was giving me dreams the night before.

Raising the beam at all revealed a nasty habit it has.  Twisting flat instead of staying vertical.  And when it wanted to twist there was nothing I could do to stop it.  Regroup.

We tried to keep it in the bracket farthest from the wall we wanted to rest one end of the beam on – that didn’t work either.  More regrouping.

Much thinking later, Dan came up with a plan to brace one of the 4×4’s on the exterior wall, with the bracket board pieces in place.  I came up with the idea of using bungee cords to keep it securely in place but not permanently attached as we need the 4×4 post in the middle of the greenhouse, not on an end.

This beam is too long, since it actually touches the ground, but we can shorten it later. The bungee cords worked well and will be so easy to remove when the time comes.

Lifting the beam that high was extremely difficult, and the twisting of the beam was quite dangerous to both of us.  Dan came up with another solution.  He drove the metal pry bar into the ground, adjacent to the beam while it was sitting in the correct position in the bracket, and then all I had to do was brace it against the pry bar and keep it vertical while letting the pry bar do most of the heavy work.  Dan did the heavy lifting, and viola!  One beam in the right location!

Center ridge beam put into a brace at the right finished height. Wow, was that hard to accomplish.

By the time we managed that, both of us were pretty well pooped.

Next chore, cut a 4×4 beam and get it in place, and braced.  This meant moving the concrete blocks again, using a piece of string as our guide and lining them up.  We got the 4×4 where it belonged, and then tried to life the ridge beam into place.

Not a chance.  Even with a taller ladder it was too much weight for Dan to handle, and I was of no practical use.  I did try to get killed a couple of times during that process, getting into the wrong location while trying to help, and getting yelled at for being in danger.    It’s hard to get good help 🙂

Lots of bracing, and post is quite solid. We will need to do this sort of bracing for the other two posts which will support the ridge beam.

After more regrouping, we called our neighbor Gary and asked him to come over and help Dan lift the beam into place.  He did, and five minutes later the beam was where it belonged.  Wow, that was easy.

One beam, fairly level and only one support beam in its rightful place.

Today we will put the other beams where they belong, and the end supports where they belong.  And tomorrow we will start putting the rafters in place.

Progress!

« Newer Posts - Older Posts »